Following this link may get you blocked.

CellTrack: An Open-Source Software for Cell Tracking and Motility Analysis

Motivation: Cell motility is a critical part of many important biological processes. Automated and sensitive cell tracking is essential to cell motility studies where the tracking results can be used for diagnostic or curative decisions and where mathematical models can be developed to deepen the understanding mechanisms underlying the cell motility.

Results: We propose a novel edge-based method for sensitive tracking of cells, and propose a scaffold of methods that achieves refined tracking results even under large displacements or deformations of the cells. The proposed methods along with other general purpose image enhancement methods are implemented in CellTrack, a self-contained, extensible, and cross-platform software package.

Availability: CellTrack is an Open Source project and is freely available at http://sacan.biomed.drexel.edu/celltrack

Contact: ahmet.sacan@drexel.edu

Publication: If you use CellTrack for you own research, please cite the following paper:

Ahmet Sacan, Hakan Ferhatosmanoglu, and Huseyin Coskun. CellTrack: An Open-Source Software for Cell Tracking and Motility Analysis. Bioinformatics (2008, submitted)

Sample Movies

You can download some sample movies and view the tracking results:

Download Software

Depending on your operating system, you need to download one of the following files:

Installation Instructions

  • Binary Distribution for MS Windows: If you are using Microsoft Windows, the binary installer should be sufficient to have CellTrack installed and running. Just follow the on-screen instructions of the installer. If you do not have the C run time library (CRT), the CellTrack application will fail to load, giving error noting that the application did not load correctly. To install the C run time library, you can either use the vccrt.msi from here, or install the .NET Framework 3.5 from Microsoft. If you wish to extend CellTrack, you need to install the required libraries and recompile CellTrack with your changes. Please follow the instructions below for compiling from source.
  • Compiling from Source: You need to first install the prerequisite libraries. Download and install wxWidgets and OpenCV libraries. Before you start compiling CellTrack, please make sure to test your wxWidgets and OpenCV installations using the test samples that come with these packages.

On a linux-based system, you can download, uncompress, and compile CellTrack using the following commands:

wget http://db.cse.ohio-state.edu/CellTrack/celltrack.tgz
tar -xzf celltrack.tgz
cd CellTrack
# you may need to edit the Makefile to reflect the library paths
make
make install

There is also a Visual Studio project file provided under msvc folder if you wish to develop using MS Visual Studio. You still need to update the library paths for the project: Right-click on the project in Solution Explorer and select Properties. Go to C-C++/General and update the entries for OpenCV and wxWidgets header paths in Additional Include Directories. Go to Linker/Input page and update the OpenCV and wxWidgets library paths under Additional Library Directories. You also need to ensure that the same Run Time library is used for code generation in all components and underlying libraries of the software.

Please feel free to contact sacan@cse.ohio-state.edu if you have any compiling or installation questions.

System Requirements

  • CellTrack requires 16MB of RAM for basic operation.
  • The actual memory requirements will depend on the size of your movie data. Generally 3 times the uncompressed size of the movie is needed for processing. So, to process a video whose uncompressed size is 10MB, CellTrack will use approximately (3×10 + 16)=46MB of memory.
  • The current implementation of CellTrack does not include a disk-based caching, and thus relies on the operating system's memory management for handling large files.
  • To speed-up the testing phase, we recommend that you reduce the size of your movies (by reducing the resolution or number of frames) while you test CellTrack for different methods and parameters. You can then apply these set of methods and parameters to the original movie data.

Quick Start Guide

The following are the common steps to be followed in CellTrack to perform a cell tracking:

  1. Crop the image to contain only the cells of interest
  2. Smooth the image to remove noise.
  3. removing_frames remove frames that are very low quality (caused especially by a moving camera capture.
  4. Go to the first frame where you want to start tracking and remove all the previous frames
  5. Use Automated Cell Detection to automatically outline cells. You can also manually_editing_cell_boundaries manually outline cells if you wish.
  6. Apply Filtering to remove too small or too big cells (or such boundaries that are incorrectly detected), or to remove cells that are too close to the frame edges.
  7. Manually remove cells you are not interested in tracking.
  8. Improve boundaries to obtain a smoother structure and a better fit to the underlying image plane.
  9. Resample boundaries to achieve a uniform sampling of the boundaries.
  10. Apply Combined tracking to track the cells as they shift and deform.
  11. Analyze or export the speed, area, deformation, or trajectory of the tracked cells.
  12. Save the resulting movie or frames.

Limitations

Note that CellTrack is by no means a final solution to all cell tracking problems. Depending on the movie you are processing, you might not get satisfactory results. We recommend that you go through each method and preview the effect of the method parameters on tracking results. The current version of CellTrack provides you with default parameters, but does not provide an automatic mechanism that can adjust the parameters to suit best the nature of the environment the cells are being tracked in or the conditions that your movie is captured. Furthormore, the current version of CellTrack does not handle occlusions. The occlusions are planned to be handled using modelling of the trajectory of individual snaxels using Kalman Filter and/or Condensation algorithm.

Detailed User Guide

Here we describe the available operations you can perform in CellTrack software. For some of the image processing operations, we have used the description of the parameters from the OpenCV documentation. The movie used for creating sample snapshots is copyright to the Cell Biology and Cytoskeleton Group at Harvard.

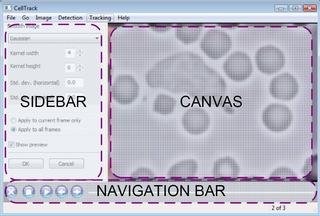
Below, you see a snapshot of the graphical user interface components. The current frame of the movie is shown in Canvas area. For the tracking operations, the canvas is split into two, showing the current frame on the right and the previous frame on the left Any contours or feature points of the current frame are drawn on top of the image. The image processing, cell detection and tracking modules are implemented as plugins. For most plugins, you are able to change the default parameters using the sidebar shown for the current plugin. A navigation bar at the bottom of the window is also provided for easy navigation through the movie and playback.

guiparts.jpg

Common Plugin Sidebar Options

  • Show Preview: Whenever possible, the plugins will allow you to preview the result of applying the plugin with the given parameters. The changes are not committed unless you press one of the Apply or OK buttons in the sidebar.
  • Application Scope: You can specify the scope of applying a plugin by selecting one of the Apply to current frame only (only the current frame is modified), Apply to all frames (all frames are modified), or Apply to current frame on (all frames after and including the current frame are affected).

Menus and Shortcuts

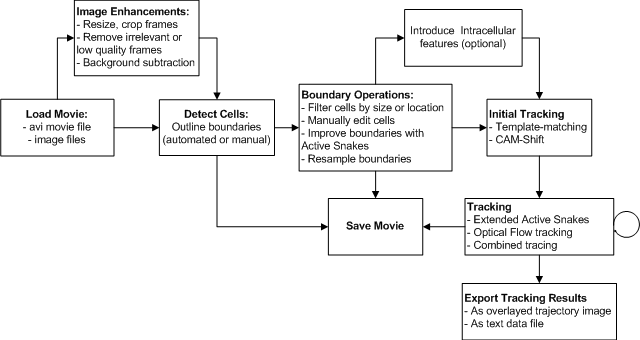
Task Flowchart

The flowchart below depicts the operations and their usual order of application in CellTrack.

Loading A Cell Movie

Commands: File → Open movie file (Ctrl+O), File → Open image files (Ctrl+Shift+O)

In CellTrack, your cell movies can either be an *.avi movie file or a set image files. CellTrack can read avi files using platform-specific video libraries. If you are having difficulty loading your movie file, please use a conversion tool to convert your movie into DIB/I420/IYUV format or uncompressed format. You can use one of the following freely available tools for this conversion: FFmpeg, mencoder, or RAD Video Tools.

Instead of a movie file, you can also use a set of image files. Make sure the alphabetical order of the image file names are the same order of the real motion capture. The following image formats are supported:

  • Windows bitmaps - BMP, DIB
  • JPEG files - JPEG, JPG, JPE
  • Portable Network Graphics - PNG
  • Portable image format - PBM, PGM, PPM
  • Sun rasters - SR, RAS
  • TIFF files - TIFF, TIF
  • OpenEXR HDR images - EXR
  • JPEG 2000 images - jp2

Saving Movie or Frames

Commands: File → Save movie as… (Ctrl+S), File → Save current frame as… (Ctrl+Shift+S)

You can save the whole movie (with object boundaries and intracellular components drawn) or individual frames. For saving individual frames, the following image formats are supported: bmp, png, jpeg, giv, pcx, pnm, xpm, ico, and cur. For saving the whole movie, you will only be able to save as an .avi movie file, but you can select the compression codec to be applied. The preferences dialog (File→Preferences Ctrl+K) has a list of available codecs you can choose from on the Saving tab. You can also enter the FOURCC code of the codec you want to use in the preferences dialog. Windows users can select to be prompted for the codec while saving (use the dropdown menu under Video codec. The preferences dialog also lets you overwrite the size and frame-rate of the movie to be saved.

Navigation and Playback

Commands: Go → Next frame (Alt+Right), Go → Previous frame (Alt+Left), Go → First frame (Alt+Up), Go → Last frame (Alt+Down), Go → Play/pause movie (Ctrl+Enter)

navigation bar

You can navigate through the loaded cell movie using the menu commands or using the navigation bar at the bottom of the window. When you are playing a movie file, the frame rate of the movie file is used for playback. When you are playing a set of image files, the default frame rate (5 f.p.s.) is used; the default frame rate can be changed in Preferences → Saving → Default fps. Note that the time to compute the display of a new frame may cause the playback rate to differ from the frame rate, especially if you have the preview option of an active plugin on.

Basic Image Operations

If you are working with large movies or images, we recommend that you reduce the size and frame count during the test phase. Once you have determined the best set of operations and parameters suited to your movie, you can apply them to the original data.

Resize

Command: Image → Resize

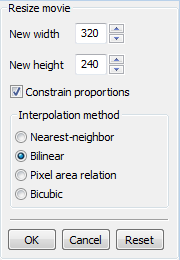
Performs a resize of the underlying image frames. Note that reducing the image size would make the application of detection and tracking operations faster, but would also degrade the resolution and image quality. Uncheck the Constrain proportions option if you wish to change the aspect ration of the frames. You can use Reset button to recall the original image size. The following interpolation methods can be performed for resizing:

  • nearest-neigbor interpolation,
  • bilinear interpolation (used by default)
  • resampling using pixel area relation. It is preferred method for image decimation that gives moire-free results. In case of zooming it is similar to nearest-neighbor method.
  • bicubic interpolation.

~~END_FLOAT_LEFT~~

Crop

Command: Image → Crop

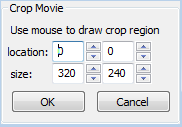
If you are concerned with only a limited subregion of the movie, you can crop the movie to use only this subregion. Cropping will remove the rest of the area and will save computational time for subsequent detection or tracking operations. You can use your mouse to draw the crop region on the canvas, or use the location and size input controls in the sidebar to define the region.
~~END_FLOAT_RIGHT~~

Smooth

Command: Image → Smooth (Ctrl+M)

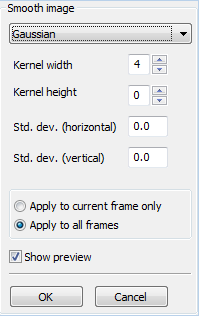
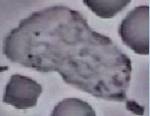
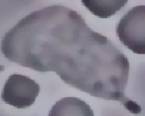
You can perform smoothing to remove the noise in your images. The following smoothing methods are available:

  • Simple Blur: Summation over a pixel neighborhood is performed with subsequent scaling. If neigbhorhood scaling parameter is zero, it is set to the initial neighborhood size.
  • Gaussian: The image is convolved with a Gaussian kernel of the given size and deviation. If kernel height is zero, it is set to be the same as kernel-width. If the horizontal or vertical standard deviation is zero, it is calculated from the kernel size: sigma = (n/2 -1)*0.3+0.8, where n is the kernel width or height, respectively.
  • Median: The median pixel value over a square neighborhood is used for smoothing.
  • Bilateral: Bilateral 3×3 filtering is applied with the given color and space values. See Bilateral Filtering for more information.

~~END_FLOAT_LEFT~~

Removing frames

Commands: Image → Delete current frame (Ctrl+Backspace), Image → Delete preceeding frames, Image → Delete proceeding frames

If you are only concerned with a specific section of the movie, you can remove the rest of the frames using the commands above. The tracking methods in CellTrack assume that the first frame includes the boundaries of the object you wish to track. If you define boundaries of interest in another frame, you need to delete the preceeding frames to force CellTrack to track these boundaries. You can also remove low-quality frames where the image is too noizy or blurry. If the movie capture is from a nonstable, moving camera, you might get some fuzzy transition frames which might need to be removed to obtain higher-quality tracking results.

Automated Cell Detection

Command: Detection → Detect cell boundaries (Ctrl+D)

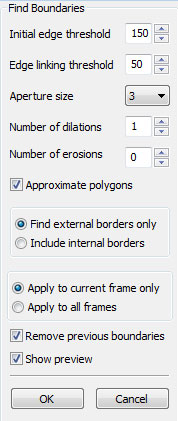
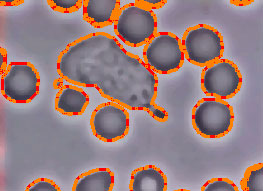
The automated cell detection first identifies the edges using Canny edge detection algorithm with the given initial edge and linking intensity threshold values. The aperture parameter is used for calculation of image derivatives. The detected edges are then dilated and optionally eroded to achieve connection of discontinuous edge segments. The connected components are then computed from this edge information to obtain the object contours. The object contours can be represented as approximated polygons (only list of vertices are kept) or as a list of all points along the contour, which can be controlled via Approximate polygons option. You also have the option of detecting only the external borders of the cells or including the intracellular components (such as the nucleus). ~~END_FLOAT_RIGHT~~

Filtering Cells

Command: Detection → Filter cells (Ctrl+F)

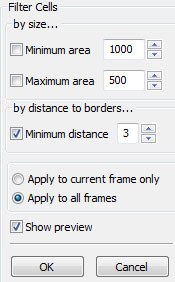
The automated cell detection may detect contours which may or may not be cells and may or may not be of interest to you. Fitering Cells is a quick way of removing unwanted objects. You can restrict the size of objects that are to be considered as cells, or specify a minimum distance to frame borders to filter out the cells that are not completely captured within the frame.
~~END_FLOAT_LEFT~~


Manually Editing Cell Boundaries

Command: Detection → Edit cells (Ctrl+E)

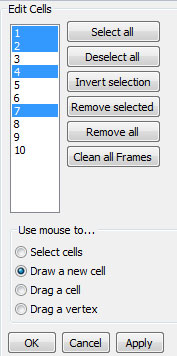
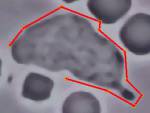
Use this plugin to manually outline a cell using the mouse. Click to start, move mouse to next vertex and click again. You can complete the drawing by either double-clicking at the next vertex, or clicking on the starting point. The sidebar will show the list of contours in the current frame. You can click on the cell id numbers to make selection. Use Shift, or Control keys in combination with mouse clicks to select multiple entries. You can then remove these contours from the current frame using Remove Selected button. Select all selects all the contours in the list. Deselect all clears all the selections. Remove all will remove all the contours from the current frame, whereas Clean all frames will remove all contours from all of the frames.

Choose from the Use mouse to… radio box to determine the mouse operation. Select cells will let you click within the contours in the canvas area to select/deselect contours. Draw a new cell lets you outline a new cell. Drag a cell lets you click and drag a whole contour of a cell. Drag a vertex lets you drag the vertices of the contours.
~~END_FLOAT_RIGHT~~

Improving boundaries

Command: Detection → Improve boundaries (Ctrl+I)

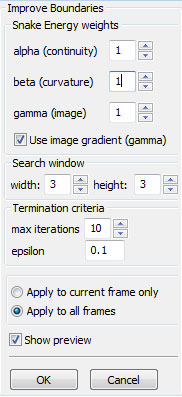
Once you automatically or manually outline cells, it is a good idea to improve these boundaries to obtain a smoother shape and at the same time obtain a good fit on the underlying image region. In CellTrack, this improvement is achieved Active contours ('Snakes: active contour models' by M. Kass, A. Witkin, and D. Terzopoulos, 1987). Active contours (or snakes) are curves that move on the image plane to minimize an energy functional. The energy functional is composed of internal and external energy terms. The internal energy is a weighted sum of continuity (stretching, weight parameter: alpha) and curvature (bending, weight parameter: beta). The external energy is the image gradient (weight parameter: gamma). The search window specifies the neighborhood searched for the next local minimal location of each snaxel. Maximum number of iterations and the minimum ratio of the changed snaxels can be specified as termination criteria for the iterative energy minimization procedure.
~~END_FLOAT_LEFT~~


Resampling boundaries

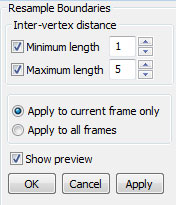
Command: Detection → Resample boundaries Automated or manual contours may not contain uniformly distributed vertices along the border of the cell. Improving boundaries or tracking operations may also cause the vertex distribution to change. For sensitive tracking results, we recommend resampling of the snaxels on the polygon curve before any tracking operation is performed. The resampling provided in CellTrack removes the points that are closer than a user-specified threshold (minimum length) and introduces new points on the edge if the edge is longer than maximum length threshold. Note that if you have already performed tracking, resampling will disrupt the asociation of the border vertices made with the boundary of the previous or next frame. So, if you desire the keep the current association of the points, you should not resample boundaries (Perform resampling only before tracking). On the other hand, if you are only concerned with tracking the whole cell and not concerned about asscociation of the border points, then resampling boundaries on an already tracked cell will give better results on further tracking.
~~END_FLOAT_RIGHT~~

Introducing Intracellular Points

Command: Detection → Find intracellular features (Ctrl+G)

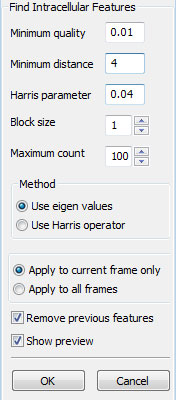
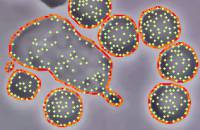
This plugin finds corners (features) with big eigen values in the image. The eigenvalue of each pixel is calculated and local maxima in 3×3 neighborhood is selected over the image. Corners with eigenvalue less than minimum quality of the maximum eigen value in the image are rejected. The features that are too close to stronger features by the minimum distance are also eliminated. Maximum count determines the maximum number of features to be detected within each cell. Block size is size of the averaging block used in eigen value calculation (or Harris edge detection). The Harris parameter is used in calculation of gradient covariation matrix if Harris method is used.

Tracking intracellular points would be useful if you are interested in the reorganization of the cell interior as it moves. CellTrack includes limited functionality for tracking intracellular points (features). The tracking methods that only shift/rotate the cells will perform tracking on the cell border and interior features equivalently and result in no conflicts. However, the optical-flow based tracking method is not interior-aware. Each of the border points and intracellular points are tracked independently, which may result in intracellular feeatures leaking out of the cell (The outlier detection and local interpolation may help avoid this conflict). The snake methods work only on the cell boundaries and do not modify or track intracellular points.

Note that, if you have high-resolution images where intracellular components (organelles or nucleus) are distinguishable, you can represent and track these components using internal boundaries instead of using intracellular points described in this plugin. Use Include internal borders option in Automated Cell Detection, or manually draw the boundaries of these components.
~~END_FLOAT_LEFT~~

Background Subtraction

Command: Detection → Background subtraction (Ctrl+B)

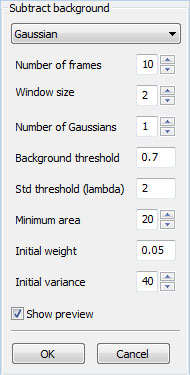
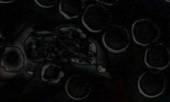
~~END_FLOAT_LEFT~~ If your application includes moving cells on a stable background, you can improve detection and tracking results by performing background subtraction. CellTrack provides two methods of background subtraction (sample results shown above). The first one (left) simply subtracts from each frame, the average of all frames. The second one (right) builds gaussian models for background and foreground, and replaces each frame with the foreground model.

The Gaussian method is based on 'An Improved Adaptive Background Mixture Model for Real-time Tracking and Shadow Detection' by P. KaewTraKulPong and R. Bowden (Proceedings of the 2nd European Workshop on Advanced Video-Based Surveillance Systems, Sept. 2001). Number of frames is used to determine the how many of the previous frames to use in building the model. For the frames that are at the beginning of the movie (where not enough previous frames are available), the model is built on the following frames.

~~END_FLOAT_RIGHT~~

Tracking methods

Below are some of the common properties and parameters you need to be aware of when running the tracking plugins:

Side-by-side display: You will see two canvas areas when you activate a tracking plugin. The canvas on the left will display previous frame, and the canvas on the right will display the next frame. If you are on the first frame currently, no frame will be shown on the left canvas; you will have navigate one frame forward.

Search window: parameter limits the neighborhood that is searched in the new frame (around the location of the bounding rectangle in the previous frame). You need to use bigger search windows if the cells move at a very high speed (or if there is a shift in camera location – or equivalently the media is moved). A very low frame-rate would also result in having a larger shift in the location of the cells, requiring a bigger search window.

Use avilable tracking, if any: This option, if selected, will initialize the tracking method with any boundaries or feature points already available in the current frame (The number of points must be the same as that of the previous frame, otherwise this option is ignored). Otherwise, an exact copy of the previous features is used as the initial guess.

Template-matching based tracking

Command: Tracking → Template-matching (Ctrl+M)

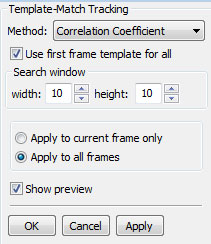
In order to track each cell, template matching method first finds the minimal rectangular area that covers the cell in the previous frame. This rectangle (pattern) is then searched in overlapped patches of the next frame using the specified comparison function. The cell is then considered to move to the best-scoring patch in the next frame. If you select Use first frame template for all option, then the cells in the first frame are taken as templates when searching them in the rest of the frames. Otherwise, each frame serves as template for only its immediately proceeding frame.
~~END_FLOAT_LEFT~~

CAM-Shift tracking

Command: Tracking → CAM-Shift tracking (Ctrl+C)

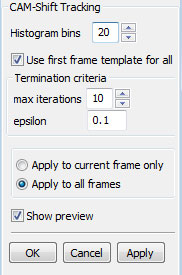
Continuously Adaptive Mean SHIFT (CAM-Shift) tracking algorithm is an implementation of 'Real Time Face and Object Tracking as a Component of a Perceptual User Interface' by Gary R. Bradski (1998, Fourth IEEE Workshop on Applications of Computer Vision (WACV'98) p. 214). CAM-Shift is based on the mean shift algorithm ('Mean shift: a robust approach toward feature space analysis' by Comaniciu and Meer, IEEE Trans. on Pattern Analysis and Machine Intelligence, 1997), a robust non-parametric iterative technique for finding the mode of probability distributions.

CAM-Shift first finds the center of the cell in the new frame using the back projection of the histogram generated from the previous frame. Then it calculates the new size and orientation for the cell. Histogram bins specify number of bins to store the histogram of the cell in the previous frame. The search termination criteria is specified as the maximum number of iterations and the minimum amount of change (epsilon) between search iterations.
~~END_FLOAT_RIGHT~~

Optical Flow tracking

Command: Tracking → Optical flow tracking (Ctrl+L)

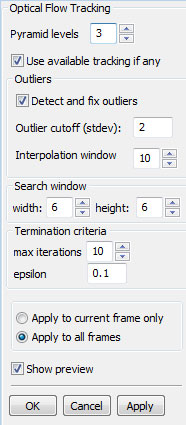
This plugin uses sparse iterative version of Lucas-Kanade optical flow in pyramids ('Pyramidal Implementation of the Lucas Kanade Feature Tracker' by Jean-Yves Bouguet, Intel Corporation, Microprocessor Research Labs, 2000. OpenCV Documents). The vertices of the cell boundaries and any intra-cellular feature points are tracked from the previous frame to the next frame.

Note that the optical flow method itself does not guarantee that the relative locations of the points will be preserved during tracking. This may result in inconsistent tracking results along the boundaries, or leakage of intra-cellular features to outside the cell. Moreover, the optical flow method may even loose some of the features (i.e., these features are not found in the new frame). To remedy these problems, we have implemented an outlier detection and update mechanism. The points that move a distance that is above a certain threshold, which is specified as a user defined coefficient of the standard deviation of all the shifts (Outlier cutoff - stdev), are considered as outliers. These outliers are then updated based on the mean-shift of the points around them that are not themselves outliers. The extend of this local window can be specified as the Interpolation window, i.e., the number of neighboring windows to consider while fixing lost or outlier points.
~~END_FLOAT_LEFT~~

Extended Snake tracking

Command: Tracking → Extended Snake tracking (Ctrl+A)

Extended Snake tracking implements a new energy functional we have developed for sensitive tracking of cells. The additional energy terms help to match up the new snake with the old snake (that is, the one from the previous frame) both internally (in relation to itself) and externally (in relation to the image plane). See the section on Improving Boundaries for the explanation of the original snake parameters (alpha, beta, and gamma) used for improving a boundary; these parameters are used without any changes here. The Match parameters, on the other hand are the weights of the energy terms that measure how well the new snake matches the old snake.

To illustrate the Match energy terms, let us consider the signed gradient energy term. Let us further consider a snaxel (point on the snake) p from the old snake (snake of the previous frame). Let p' be the current new location of this snaxel on the new frame. The energy minimization algorithm will search the neighboring pixels of p' to see if p' can be moved to a lower energy location. Let p* be such a possible neighboring location. The matching signed gradient energy of p* is calculated as follows: |E*signed_gradient - Esigned_gradient|, where E*signed_gradient is the signed gradient value at location p* and Esigned_gradient is the signed gradient value of the old snaxel p. A similar calculation is performed for the other energy terms. The cumulative energy at p* is the weighted sum of all energy terms (These weights can be adjusted by the user in the plugin sidebar). If p* has the minimal energy in the neighborhood, then p' is updated to p*. A similar update is performed for all of the snaxels at each search iteration.

Note: The Extended Snake Tracking method is currently being validated. An extensive quantitative evaluation along with comparison with other methods are currently in process.
~~END_FLOAT_RIGHT~~

Combined tracking

Command: Tracking → Combined tracking (Ctrl+T)

Combined tracking provides an ensemble of the other tracking methods, one applied after the other, for each frame. Note that this is different than applying the methods separately for all frames (i.e., in combined tracking, method A and then method B is applied to track from frame 1 to frame 2, and method A and then method B is applied to track from frame 2 to frame 3; whereas applying the plugins separately would be equivalent to applying method A to track 1→2 and 2→3, and then applying method B to track 1→2 and 2→3).

You can select which methods to apply. An initial tracking can be calculated using either Template-matching or CAM-Shift methods. The Template-matching or CAM-Shift methods provide an initial tracking that is robust to large shifts of media or camera (We recommend you turn off Template-matching and CAM-Shift methods if your movie contains highly similar cells that are very close to each other). This initial method can then be improved by Optical Flow and/or Extended Snake tracking. The parameters for each of these methods can be adjusted within this plugin. After tracking at each new frame, you can select to Resample boundaries which will eliminate the snaxels that come too close to each other, or introduce new points in between snaxels that grow too far apart. This resampling will help obtain a sensitive tracking of the cell. Note that if your application requires the association of snaxels as output, you should not use this resampling which will disrupt the association obtained from tracking.

Note: The Combined Tracking method is currently being validated. An extensive quantitative evaluation along with comparison with other methods are currently in process.
~~END_FLOAT_LEFT~~


Analyzing Tracking Results

CellTrack provides some basic motility analysis features like ability to view the trajectory, speed, area, and deformation of the cells across movie frames. To make analysis using external programs possible, you can also export the tracking data as clear-text files. The tracking data of a cell is included only if this cell is present in the first frame of the movie. If you have frames at the beginning of the movie, you can remove these frames and make the starting frame of interest to be the first frame.

Cell Speed

Commands: Analysis → Cell Speed → Plot speed, Export speed data

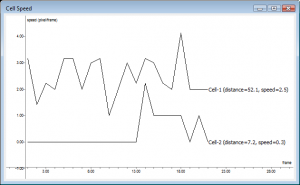
The speed of a cell is calculated as the displacement of its center of mass across frames. The figure on the right gives the speed plot of two cells. Cell 1 is a constantly moving cell, whereas Cell 2 starts moving at 10th frame and comes back to rest. The total distance traveled by each cell and the average speeds are also given in the plot legends. You can use the mouse to navigate in a plot. Right-click on the plot once to see available mouse commands. Right-click and drag the mouse to shift the plot.

If you wish to analyze the speed data for externally, or save it for future reference, you can use the Analysis → Cell Speed → Export speed data menu command to save the speeds of cells in a text file. The format of the text file is shown in the example below. The first line gives general information about the movie size, number of frames, and frames per second. The 2nd line gives the number of cells being tracked. For each cell, a header line gives the general statistics for the cell including the number of points used to describe the cell boundary, the total distance traveled by the cell, and the average speed of the cell. The following numbers record the speed of the cell between consecutive frames. For each of the Cell 1 and Cell 2 below, 21 speed entries would be recorded (the last frame does not have a speed defined, so not given).

#width: 320, height: 240, frameCount: 22, fps: 2
#cellCount: 2
#Cell: 1, pointCount: 168, totalDistance: 50.731670, avgSped: 2.415794
2.000000
2.828427
2.000000
...
#Cell: 2, pointCount: 60, totalDistance: 7.236068, avgSped: 0.344575
0.000000
0.000000
0.000000
...

~~END_FLOAT_RIGHT~~

Area of the Cells

Commands: Analysis → Cell Speed → Plot ara, Plot change in are, Export area data

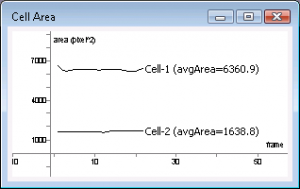
You can plot or export the area, or the change in the area, of the cells across frames. You can use the area information to filter cells based on their area. The area of the moving cells would change slightly as they move, whereas the area of the stable cells will not change. Note that significant changes in the area of a cell might be an indication of the cell moving out of focal plane or out of the view. The area plots and the data export format are similar to those of the Cell Speed described above. The area values are given in units of pixel^2.

#width: 320, height: 240, frameCount: 22, fps: 2
#cellCount: 2
#Cell: 1, pointCount: 168, avgArea: 6342.636230
6666.000000
6478.500000
6362.500000
...
#Cell: 2, pointCount: 60, avgArea: 1622.250000
1618.000000
1639.500000
1580.500000
...

~~END_FLOAT_LEFT~~

Cell Deformation

Commands: Analysis → Cell Deformation → Plot deformation, Export deformation data

The deformation is calculated as the difference in the overlapped areas of the cells in consecutive frames. The cell from frame t is drawn onto the same cell in frame t+1, shifted to match their centers of mass. The non-overlapping areas from both cells are summed up to give the deformation value between these two frames. The cells that actively move using pseudopods will give larger deformation values as they move, whereas the cells that are passively drifted in the media, or that appear moving because of camera-shift will maintain their shape and not give smaller deformation values. The data export format is similar to that of Cell Speed described above.

#width: 320, height: 240, frameCount: 22, fps: 2
#cellCount: 2
#Cell: 1, pointCount: 168, avgDeformation: 2012.023804
2031.500000
1988.000000
2000.000000
...
#Cell: 2, pointCount: 60, avgDeformation: 724.166687
713.500000
737.000000
727.500000
...

~~END_FLOAT_RIGHT~~

Cell Trajectory

Commands: Analysis → Trajectory → View trajectory, Save as image, Export trajectory data

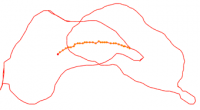
The trajectory gives only the tracking of the center of each cell, providing information about the overall movement of the cell. You can view or save the trajectory as an image, or export the trajectory data into a text file. For reference, the starting and ending configurations of the cell are also shown on the trajectory image. The speed of the whole cell described above is calculated using the amount of displacement between frames. The data format for the trajectory is similar to that of cell_speed. For each cell, tab-separated <x,y> coordinates of the center of mass is given on a separate line for each frame. The data sample below shows that the cell-1 (its center of mass) moves from <132,87> to <130,87> to <128,85>,….

#width: 320, height: 240, frameCount: 22, fps: 2
#cellCount: 2
#Cell: 1, pointCount: 168
132	87
130	87
128	85
...
#Cell: 2, pointCount: 60
164	30
164	30
164	30
...

~~END_FLOAT_LEFT~~

Detailed Cell Tracking

Commands: Analysis → Tracking → View tracking, Save as image, Export tracking data, Import tracking data The detailed cell tracking gives the movement of each of the control points (whether it be on the borders or intracellular features) throughout the whole movie frames. Note that for accurate point-wise tracking, you need to avoid using [#resampling_boundaries|Boundary resampling]] after a tracking method is applied, and turn off Boundary Resampling if you are using Combined tracking method. The boundary resampling would delete existing control points or introduce new control points and cause the association of control points to be lost.

The tracking image shows the path followed by each tracked point across frames. The beginning and the final configuration of the cell boundary are also drawn for reference. You can also export the tracking information as a data text file. The following shows a sample exported tracking data. For each cell, the object identifier and the number of control points on this cell are printed, followed by the x and y coordinates of each control point across all frames. For instance, the first control point of the first cell below moves from <119,41> to <118,42> to <118,41> in the first 3 frames. The coordinates are separated by tabs ('\t'). Note that the exported tracking data can later be imported into CellTrack.

#width: 320, height: 240, frameCount: 22, fps: 2
#cellCount: 2
#Cell: 1, pointCount: 168
119	41	116	42	114	43	...
118	42	116	43	115	44	...
118	41	115	42	114	43	...
...
#Cell: 2, pointCount: 60
155	8	153	9	151	10	...
155	8	153	9	151	10	...
155	9	153	10	150	11	...

The following sample C++ code is provided for your convenience if you wish to parse the exported tracking data:

FILE *fp = fopen("track.txt","r");
int NumCells;
int Width, Height, FrameCount, FSP;
if( fscanf(fp, "#width: %d, height: %d, frameCount: %d, fps: %d\n#cellCount: %d\n", &Width, &Height, &FrameCount, &FSP, &NumCells) !=5 ) {
	wxLogError("Unable to parse file header %s", file);	return false;
}
for (int c=0; c<NumCells; c++){
	int cellid,np;
	if( fscanf(fp, "#Cell: %d, pointCount: %d\n", &cellid, &np) !=2 ) {
		wxLogError("Unable to parse file %s for cell %d header %s", file, c+1);	return false;
	}
	for (int j=0; j<FrameCount; j++) {
		std::vector<wxPoint> roi(np);
		for (int i=0; i<np; i++){
			if( fscanf(fp, "%d %d", &roi[i].x, &roi[i].y) !=2 ) {
				wxLogError("Unable to parse file %s for cell %d coordinates", file, c+1);	return false;
			}
		}
		// the roi variable here contains the contour for Cell 'c'
		// at frame 'j'
		book[j]->AddRoi(roi);
	}
}
fclose(fp);

~~END_FLOAT_RIGHT~~


Notes for Developers

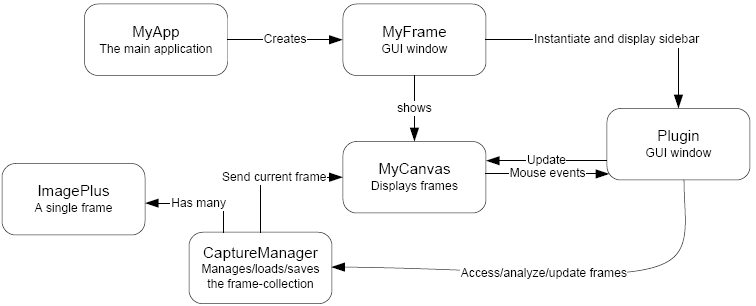
This section is geared toward researchers or developers wishing to extend CellTrack by implementing new plugins. A general overview of the source architecture is given followed by instructions to get you started in writing a new plugin. The figure below shows a simplified outline of the classes and modules used in CellTrack.


MyFrame implements the main graphical interface and manages user-interaction. The frames are loaded from a movie file or image files into the CaptureManager which manages the collection (book) of frames. Each frame is an instantiation of ImagePlus class. The ImagePlus encapsulates the original loaded image, the boundary polygons, and the intracellular features. Each plugin is instantiated by the MyFrame upon a user request. The plugins can access the movie frames through CaptureManager, change the underlying image or the boundaries, and request an update of the canvas after the processing. The CaptureManager includes a frame separate from the frame book so that the plugin preview can be performed on this working frame without committing changes into the book.

If you want to develop a new plugin, you will need to first design a sidebar to accept the parameters (if any) from the user. See src/gui/Gui.h and src/gui/Gui.cpp files for the definition of the available plugin sidebars. The processing logic is separated from the user interface; you need to create a new class inheriting the sidebar design class. For example, the FindContoursSidebar (in src/plugins/ folder) processing class inherits the FindContoursSidebar_ user interface design class. The src/plugins/PluginDefinitions.h file includes macros to automate this inheritance.

The plugin module itself needs to be a subclass of PluginBase and override the relavant functions important to your plugin. If your plugin analyzes and operates on the current frame only, you need to override void ProcessImage( ImagePlus *img ) function where img parameter will be given to be a pointer to the current frame. In this case, you don't need to access the CaptureManager object (cm), you can simply work on the img object. On the other hand, if you are implementing a tracking plugin where you need to analyze more than one frame, you need to override void ProcessImage( ImagePlus *img, int pos ) function where img is again a pointer to the current frame, and pos is the position of the current frame. You can access other frames through the CaptureManager object cm.

The previewing and committing of changes to all frames is automatically performed by the base class. You may want to change the default processing by overriding the relavant functions (such as DoPreview, OnOK).

In most cases, you won't need to access the Canvas directly. However, if you are implementing a plugin where you need to gather information through user's actions on the canvas (such as dragging a cell using the mouse), you need to register the plugin as a listener of the relavant events. Please see the src/plugins/EditContoursPlugin.cpp plugin for a sample of this functionality.